Sunday, March 26, 2017

Monopoly


I'm guessing that most of us have played, or at least heard of, the game of Monopoly. I'm also gonna take a guess that not many of us have ever finished a game of Monopoly, but that's beside the point. For any of you who may not no the rules, the main concept is to move around the board by rolling two die, and buy properties as you land on them so that you can make money when your opponents land on said properties. Here's a link to the complete rules of the game.


In this blog I'll explain the best strategy to Monopoly by finding out what spaces are expected to be visited most, as well as which properties get the most bang for their buck based on how many people are playing. 

Not All Spaces are Created Equal

Those of you who have played Monopoly before, you've probably noticed that spaces like jail are more frequently visited than other spaces. Why is this? If the only way to move around the board was by rolling the two die, then the probability of spaces being visited would be distributed equally. In other words, at any point in the game the chances of your pieces being on any given space would be the same as any other space. What's different about Monopoly is that there are spaces such as "CHANCE" and "GO TO JAIL" that can send you to different spaces around the board. One can approach finding the probability distribution of spaces visited via simulation, or theory (both yield similar results). 

One method that has been used to figure out the distribution is by creating a computer program that simulates hundreds of thousand of games and simply counts how many times each space is visited. The results that come from the simulations usually are almost identical to the method we will begin to dive into. 

The second method uses a model called Markov Chains. Lets first define Markov Chains.  

Definition: A stochastic model describing a sequence of possible events in which the probability of each event depends only on the state attained in the previous event. 

Mathematical Definition: a sequence x0 , x1 , x2, … of probability vectors, along with a stochastic matrix A so that x1 = Ax0 , x2 = Ax1 , and, in general, xn+1 = Axn. 

In the context of Monopoly, Markov Chains essentially allows us to find the probability of moving from another given space to any other. Lets think about how this precess would work. We'll start out by numbering each space 0-39, "GO" being 0 and "BOARDWALK" being 39. If we start at space 0, we know that when you roll two die you can move ahead anywhere from 2-12 spaces. Given two six-sided die, the only possible way to roll a 2 would be to roll snake eyes. The probability of this is 1/36=2.8%. So there is a a 2.8% chance of moving from space 0 to space 2. We can calculate the probability of moving to any given space from space 0. Note that because we have a "CHANCE" at space 7, it is possible to move to more spaces that 2-12. In fact, it turns out that you have a 1.2% chance of going to jail on your first turn (bummer summer dude). We can repeat this process with every space to find a final distribution of how often each space is visited. You can imagine this would take a while, so instead of wasting your time I'll draw a diagram in my presentation that helps explain how this process would work. Here's a graph of the final distribution. 


Lets Talk Money
It's not enough to know how often each space is expected to be visited, we now must look into the payoff we can expect to receive by investing in different properties. We can find the expected earnings of each individual space by pairing the number of times that space is expected to be visited with how much money you will gain per visit. So basically what we would be doing is finding the expected earnings per opponent role. Looking at individual properties, we can create a graph that shows how one would expect their profits to grow as the game goes on. This graph is shown below. 


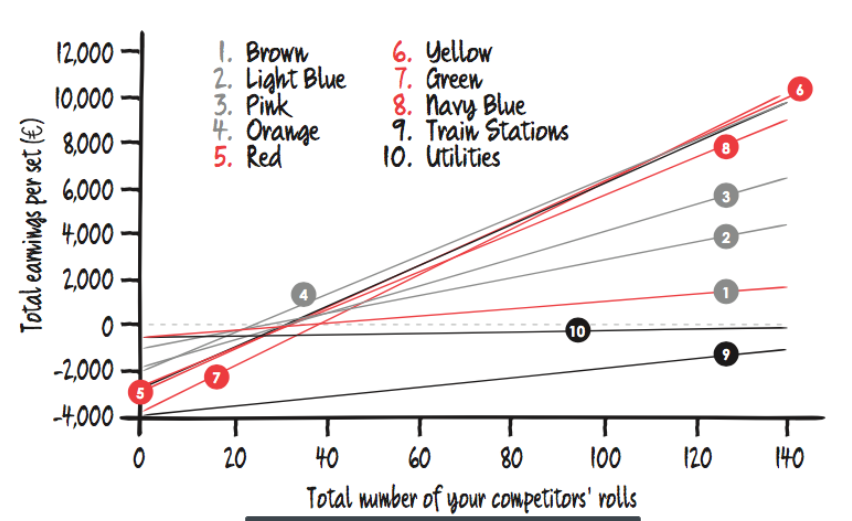
Looking at this graph alone, Mayfair is the best space to own based on the expected amount of roles it would to take to break even, and potential long term earnings. However, in Monopoly you must buy properties in sets. For example if you own Baltic Avenue, you also own Mediterranean Avenue because thy are both in the brown set. Because of this, we must adjust our graph to show expected earnings when owning different colors, rather than individual spaces. Our new graph is displayed below. 

    
 Now we can begin to see what spaces we should consider purchasing. Clearly Train Stations aren't worth considering, while the orange and yellow spaces catch our interest.

Considering the Number of Players
One question you're probably asking is how many opponent rolls are expected in an average game. This is where the number of opponents comes into play. When we have fewer players, we should expect fewer rolls. When we expect fewer rolls, we should consider purchasing colors that break even early on in the game. On the flip side, if we have many players we should expect more rolls, in which case you would want to purchase colors that have greater long-term earnings. 

Conclusion
Knowing the expected earnings of each property, and considering the number of opponents, we can keep the following strategy in mind when playing Monopoly. 

-When facing one opponent, the Light Blue and Orange spaces are best
-When facing 2-3 opponents, the Orange and Red spaces are the best
-When facing 4+ opponents, the Green spaces are best
-Don't ever bother with the Navy Blue, Yellow, or Train Station spaces

Feel free to comment or ask any questions, and don't be afraid to be that weirdo who pulls up a math blog at your next family gathering to kick some ass in Monopoly!


Bibliography
Standupmaths. "The Mathematics of Winning Monopoly." YouTube. YouTube, 08 Dec. 2016. Web. 26 Mar. 2017. 
"Probabilities in the Game of Monopoly®." Probabilities in the Game of Monopoly®. N.p., n.d. Web. 26 Mar. 2017. 
"Markov Chain." Wikipedia. Wikimedia Foundation, 25 Mar. 2017. Web. 26 Mar. 2017.
"THE MONOPOLY GAME RULES." THE MONOPOLY GAME RULES: STANDARD OR LONG RULES (n.d.): n. pag. Avcschool.com. Web. 
Hoehn, Stacy. "Monopoly and Mathematics: Linear Algebra in Action." The Mathematics Teacher 108.4 (2014): 280-86. Web. 


The Settlers of Catan

http://variety.com/2015/film/news/settlers-of-catan-movie-tv-project-gail-katz-1201437121/
I sincerely hope that everyone has had the opportunity to experience this board game as it is truly a masterpiece! If you have not yet had the chance, before class on Tuesday I would definitely recommend checking out: https://catanuniverse.com/en/game where you can play online and learn the basics of the game. Catan has TONS of rules so I think it will be beneficial to give an overview of the game propelling us forward consistently so we can talk about some more interesting stuff!

Game Components
The game is made up of the following components:

• 19 terrain hexes (tiles) 
• 6 sea frame pieces 
• 9 harbor pieces 
• 18 circular number tokens (chits) 
• 95 Resource Cards (bearing the symbols for the ore, grain, lumber, wool, and brick resources) 
• 25 Development Cards (14 Knight/Soldier Cards, 6 Progress Cards, 5 Victory Point Cards) 
• 4 “Building Costs” Cards 
• 2 Special Cards: “Longest Road” & “Largest Army” 
• 16 cities (4 of each color shaped like churches) 
• 20 settlements (5 of each color shaped like houses) 
• 60 roads (15 of each color shaped like bars) 
• 2 dice (1 yellow, 1 red) 
• 1 robber 
• 1 Game Rules & Almanac booklet

Game Setup
The game can be setup from a beginner version where the oldest player goes first, but as we are all experienced math students, age has become trivial as a deciding factor, and we must leave it up to chance to decide who goes first. 

In this version of Catan, called Variable Game Setup, the board is setup in the following manner:
1. The terrain hexes will be placed face up, randomly inside the board frame (6 sea frame pieces).
2. The harbor pieces will be placed face up, randomly on each of the 9 harbors on the board frame.
3. The 18 number tokens will be placed face up, moving from one corner of the board, circularly counter clockwise in toward the center of board, skipping the desert.

https://media.giphy.com/media/qgs1fA4rZhLKU/giphy.gif
Each player begins the game by choosing the color of their pieces and receives the following: 5 settlements, 4 cities, and 15 road segments.

Each player rolls both dice, and the player who rolls the highest goes first and begins the game. That player then places their first settlement and a road segment adjacent to their settlement. The other players then follow suit, in a clockwise motion. Once every player has laid down one settlement and one road segment, the last player to do so lays down their second settlement and second road segment, and then they pick up the three resource cards from tiles on which they laid their second settlement. The rest of the players again follow suit, picking up their resource cards along the way as well.

The player who rolled highest initially will be the last to place their second settlement, but will begin the game by rolling the dice!

Game Play
Your turn:

As your turn begins, you roll the die for resource production - this roll applies to all players, so if you roll an 8 and other players also have a settlement on an 8 then they also collect their respective resource.

Following your roll, you have the ability to trade resources either with other players (domestic trade) - through whatever method each party sees fit, or via a maritime trade - in which you can trade 4 of the same resource for any 1 resource you seek. If you have a settlement on a port you can trade at a ratio of 3:1 or 2:1 depending on the port.

After you have finished trading you can build roads, settlements, cities, or buy a development card. You can also play one development card during your turn, but you may not play a development card that you bought in the same turn.

Note: As ability increases, combining trading and building is suggested, it not only makes the game more fun but it speeds up play! 

Building
Building requires resources and everything that you need to build in the game requires different resources.

Roads: 1 Brick, 1 Lumber
Settlements: 1 Brick, 1 Lumber, 1 Wool, and 1 Grain
Cities: 3 Ore and 2 Grain
Development Cards: 1 Ore, 1 Wool, and 1 Grain

A quick note on roads, the first player to build a continuous road (not containing forks) receiving a special card appropriately called Longest Road worth two victory points. If another player surpasses 5 that player is now the rightful owner of the Longest road, and two victory points. 

Special Cases
1. Activating the robber! *GASP*

If a 7 is rolled, nobody collects any resources as there are no chits with the number 7 on them. 

Additionally, every player who has more than 7 resource cards forfeits half (rounded down (the floor)) of their cards and must return them to their respective piles.

Whoever is responsible for rolling the 7 must then move the robber, to wherever you see fit, which includes the desert tile! This means hindering your opponents from collecting resources if the robber is on one of their settlement's hex tiles, or maintaining a neutral relationship with players if you decide to place the robber on the desert. 

Finally, you may then steal (it is a robber after all) 1 random resource card from another player who has a settlement adjacent to the target terrain hex. 

https://memegenerator.net/instance/34567149/success-kid-rolls-a-7-in-settlers-of-catan-has-6-cards
2. Playing Development Cards

Types of Development Cards:

Knight: The player can move the robber.
Road Building: The player can place two road segments, just as if they built them like normal.
Year of Plenty: The player can pick up any two resource cards of their choice from the bank.
Monopoly: The player can claim all resources of a single type from the other players in the game, which they currently hold.
Victory Point Card: This adds 1 victory point to a player's total and should be kept hidden until the player is ready to declare victory!

As I said earlier, at any point during your turn you can play 1 Development Card, which you already had. 

The first player to reveal 3 Knight cards, commands the Largest Army in the game and receives 2 victory points, until another player gets a larger number of knight cards, similar to Longest Road.

Winning
If you have 10 or more victory points during your turn, then you've won and the game is over! If you find yourself in the situation where you have accrued 10 victory points and it isn't your turn then you must wait until it is your turn to declare victory.

https://media.giphy.com/media/SxthdSyeTcbRK/giphy.gif
Alright, a rather long winded introduction to the rules, but I felt that it was necessary in order to discuss some of the math going on in the game!

I want to leave you all with the following questions, which I hope to also talk about on Tuesday:

Does anyone think that getting robbed can be a good thing?

How can we think about Catan from an economist's point of view?


https://www.buzzfeed.com/ashleyperez/how-to-piss-off-every-settler-of-catan-in-just-14-moves?utm_term=.wodxaMvVy#.wtpqg5pYW

Sources:
"Development Card." World of Catan Wiki. Wikia, n.d. Web. 23 Mar. 2017.
Teuber, Klaus. "Game Rules & Almanac." Settlers of Catan. N.p., 1995. Web. 23 Mar. 2017.

Wednesday, March 15, 2017

Scotland Yard

Scotland Yard

Scotland Yard is a board game that has many similarities to the versions of "Cops and Robbers" we have looked at in class.  It involves 5 detectives or "cops" whose goal is to track down Mr. X or the "robber" with limited information about his whereabouts.

First off, I will explain the rules and game setup of Scotland Yard.  Then, I will explain how the Monte-Carlo Tree Search Strategy (MCTS) can be used to help the detectives find Mr. X in a shorter amount of time.

Let's get started...


Game Set Up & Rules

Scotland Yard is played with five detectives and one Mr. X.  Hence, the game can be played with at most six players and at least two, where one player would control all five detectives. The game is played on a map of London with numbered locations from one to 199.  The locations are connected to each other by four different transport types: taxi, bus, underground, and boat.  A player must play the proper ticket to move along the corresponding transport type.

The game board looks like this:


SOURCE: https://cf.geekdo-images.com/images/pic557147.jpg

As you can see, the locations are connected with white, redblue, and black lines.  These lines correspond to taxibusunderground, and boat tickets respectively.  Players must use the proper ticket to move along the edges of the map. 

To begin, each player draws from a stack of tickets that contain 18 different starting locations and all five detectives place their pawns on the locations they drew. Mr. X, however, keeps his position a secret.  At the start, each detective receives:

10 taxi tickets,
8 bus tickets, and
4 underground tickets

and Mr. X receives:

4 taxi tickets, 
3 bus tickets, and
3 underground tickets.

Immediately you might be thinking: "Hey, that's not fair, Mr. X is at an extreme disadvantage!" However, while Mr. X does get less of each ticket, he also is granted five black-fare tickets, and two double-move tickets.  A black-fare ticket allows Mr. X to use any type of transport, including the boat (which the detectives do not have access to).  The double-move tickets allow Mr. X to perform two moves in one turn.  Additionally, whenever a detective uses a transport ticket, that ticket is given to Mr. X for further use.

Mr. X moves first, followed by the detectives.  No two detectives can occupy the same location. Throughout the game, Mr. X records his location in his log book and then covers it up with the type of ticket he used to get there.  Here is a picture of what Mr. X's log book might look like after seven rounds:


While the detectives are unaware of Mr. X's exact location, they are able to use the types of tickets he uses as clues.

You also may have noticed that moves numbered 3, 8, 13, 18, and 24 are all circled in the log book. This is to indicate that on those moves, Mr. X must reveal his location to the detectives.

The game is won when a detective lands on the same location as Mr. X.

I know the rules are a bit dense, so please do not hesitate to ask for clarification in the comments section.

Monte-Carlo Tree Search Strategy

The Monte-Carlo Tree Search Strategy (MCTS) has been applied to many other games such as Chinese Checkers.  However, it gets a bit more complicated when applied to games with imperfect information, such as Scotland Yard.

Basically, MCTS allows the detectives to break down the game board into smaller graphs and make better guesses as to where Mr. X might be hiding.  How it works is that each turn the detectives guess possible locations for Mr. X.  These guesses can be limited by removing the locations he cannot be based on his previous tickets used.  This list of possible locations should be updated every move.

After Mr. X makes a move, the new list of possible locations is denoted by the set N. N is calculated based on the old list of possible locations, or M, the current locations of the seekers (D), and the ticket played by Mr. X (t). So,

N = {set of all Mr. X's possible locations}
M = {previous possible locations of Mr. X}
D = {set of all detective's positions}
t = type of ticket used

Let's start with the easiest example, the beginning of the game, before any move has been taken by the detectives or Mr. X:

Let A = the 18 possible starting locations.
So, A = {13, 26, 29, 34, 50, 53, 91, 94, 103, 112, 117, 132, 138, 141, 155, 174, 197, 198}.  
Let's say the five detectives draw 13, 103, 112, 141, and 174. 
So, D = {13, 103, 112, 141, 174}.  
Thus, N = {26, 29, 34, 50, 53, 91, 94, 117, 132, 138, 155, 197, 198} 
or N = A - D since Mr. X cannot start on the same location as any detective.

Now, let's look at a bit tricker example of how to use MCTS.

Here is a visual of the area on the map I will use for this next example:


Let's assume that on round 8, Mr. X revealed himself to be at location 86.
And after Mr. X revealed himself, the detectives moved to 85, 115, 89, 116, and 127.
In round 9, Mr. X plays a black-fare ticket, which masks the type of transport he used to move.
Thus in round 9, N = {69, 87, 102, 103, 104}. Where N is ALL the adjacent locations to 86 since we do not know the ticket type.
Location 116 is also adjacent to 86, however, a detective occupies that spot, so it will not be added to N.
In round 10, we can do the same process, illustrated in this chart:
SOURCE: "Monte-Carlo Tree Search for the Game of Scotland Yard"

As you can see in the chart, detective 1 moved to 103 and detective 2 moved to 102, hence 102 and 103 can be removed from Mr. X's possible locations and our M for round 10 becomes M = {69, 87, 104}.

The chart shows that Mr. X uses a taxi ticket in round 10. We can use this information and the fact that we know Mr. X must be at location 69, 87, or 104 to calculate N.  In this case, N = {53, 68, 86, 70}. Since these are the only positions Mr. X can travel to with a taxi ticket from 69, 87 or 104 without hitting a detective.

We can continue this strategy until N becomes smaller and smaller and eventually we will know Mr. X's location for sure.

Concluding Remarks

While MCTS helps us in Scotland Yard to a certain extent, there is a way that the detectives can make their guesses even more precise.  Using a strategy called location categorization, each guess can be categorized into groups based on the probability Mr. X will move there.

In Scotland Yard we can use three different types of categorization: minimum distance, average distance, and station type. I will go more in depth on location categorization during my presentation.

MCTS along with location categorization can help the detectives reduce the randomness of Scotland Yard, and find Mr. X much faster.  It is important to note that Scotland Yard can be looked at as a giant game of "Cops and Robbers" with a lot of randomness sprinkled in.

I look forward to playing it with you all on Thursday!

Bibliography

Nijssen, A. M., and Mark HM Winands. "Monte-Carlo Tree Search for the Game of Scotland         Yard." Maastricht University. 2011 IEEE Conference on Computational Intelligence and Games. Web. <https://dke.maastrichtuniversity.nl/m.winands/documents/Cig2011pape42.pdf>.

Sevenster, Merlijn. "The complexity of Scotland Yard." University of Amsterdam. 8 Mar. 2006. Web. <http://www.illc.uva.nl/Research/Publications/Reports/PP-2006-18.text.pdf>.


Monday, March 13, 2017

Bargaining Model of War

Bargaining Model of War:     

Now, lets begin with some (strong) assumptions- centered on the page and numbered:

1. Two states A and B

2. Dispute over an object worth that is standardized to 1

The 1 equals 100% over the object. Where the object can be anything disputed over by both states, whether it be land, resources, or infrastructure.

i.e. An oil field valued to be $80 million equals 1
The Amazon rainforest in its entirety is equal to 1


3. Power remains stable through time
No external forces can act on the probability of victory

4. Everyone knows each other's probabilities/payoffs

5. Object is infinitely divisible 

6. No splendid first strike advantages 
First strike is the ability to destroy most of the retaliatory response and achieve minimal damage to self.

P(A) is the probability where state A wins the war
P(B) is the probability where state B wins the war
          
7. There are no draws, so P(A) + P(B) = 1

P(A) and P(B) are expectations.

8.If the states fight a war they will both incur costs that reflect absolute costs and resolve.

Absolute costs constitute souls lost, property damage, and wartime economic disruption

Resolve constitutes the value of how much a state cares about the issue (interest) and will decrease the cost.

A state with a higher resolve over an issue is willing to incur higher absolute cost over that issue.

For instance: Scotland has a higher resolve over Edinburgh than China does and would be willing to put up more absolute costs for proprietorship. (because China does not care about Edinburgh) 

         
Let C(A) be the expected cost that state A incurs over the war divided by the total amount of the object and standardized. 
Let C(B) be the expected cost that state B incurs over the war divided by the total amount of the object and standardized. 
          
       9. C(A)>0 and C(B)>0, the cost of war will never outweigh the value of the war

Let E(A) and E(B) denote the expected outcomes of war for State A and State B respectively in a winner-take-all assumption. God bless Thomas Bayes. 

E(A) = (P(A))*1 + (1-P(A))(0) -C(A)
         = P(A)-C(A)

E(B) = (P(B))*1 + (1-P(B))(0) +C(B)
         = P(B)+C(B)

C(B) is added to P(B), rather than subtracted, because if we look at it from B's perspective a positive cost will decrease capital. 

Basically, the expected outcome from war is the probability of winning the war minus the cost of fighting.

Seemingly, a state that has a higher expected probability of winning a war will incur lesser costs in expectation. For generality (using basic algebra), on answering the next question, let us not create a function for this.

Provided with these assumptions, is it possible to have a negotiated contract that is a viable alternative to war for both states simultaneously? 

Answer: Yes, but only if a negotiated contract yields a greater outcome than the expected value of conducting war for both states. 

This leads to the following peace constraints, but lets look at the costs first.


State A's Peace Constraint
   
Let x be State A's share of the bargained settlement, which has been standardized to 1, the complete value of what is being waged on, so 0<=x<=1

State A is content if x>= E(A)>=P(A)(1)-C(A)
                                 x>=E(A)>=P(A)-C(A)

In words, State A is satisfied if the probability of winning a war minus the cost is less than the negotiated contract x. Satisfaction implies bargain, i.e. not fighting. Makes sense, doesn't it?

State B's Peace Constraint

1-x is State B's share of bargained settlement, because State B gets everything that State A does not have

State B is content if 1-x>=1-E(B)>=P(B)(1)-C(B) 
                                 1-x>=1-E(B)>=P(B)-C(B)
                                  x<= E(B)<=1-P(B) + C(B)

In words, State B would rather fight than allow State A to take more than the cost that State B would incur. 

Combining these we realize that State A and State B can reach a mutually satisfactory agreement if there exists an x, such that x exists between the cost of war for State A and the cost of war for State B.


P(A)-C(A)<=x<=1-P(B)+C(B)

From the earlier assumption we know, P(A)+P(B) =1
which implies P(B)=1-P(A)

P(A)-C(A)<=X<=1-(1-P(A))+C(B)
P(A)-C(A)<=P(A)+C(B)
-C(A)<=C(B)
C(A)+C(B)>=0
C(A)+C(B)>0 
(the greater than or equal sign drops from earlier assumptions because C(A)>0 and C(B)>0)

Ok... That is great, but how do we interpret this result?

Basically(precisely), a bargained settlement can exists if the cost of war for either State A or State B is greater than zero.

And the bargaining range is mutually preferable to war.

Thinking back to the definition of x: x represents the total amount amount of an object standardized between and knowing that it exists between 0 and 1, it is possible to visualize a peace interval.. As follows:

Now lets add one more assumption to our model. 
movies dr strangelove doctor strangelove
source: http://giphy.com/search/dr-strangelove

-Suppose the same as before, but now Suppose State A controls the entire object at the start and has to negotiate with what State B wants on a take-it-or-leave-it offer.

-If State B accepts, the settlement is contracted. Otherwise, the states fight. 

This gives us a "Crisis Bargaining Model"

This is just a way to model the algebra that we just did. 

If State B accepts the contract, State A earns x and State B gets 1-x. State A payoffs are in red, while State B payoffs are in blue. 


If State B rejects the contract we need to calculate State A's  expected payoff and State B's expected payoff through backwards induction. We have calculated these numbers previously and I will do the backwards induction in class. 

E(A)=P(A)-C(A)
E(B)=1- P(A)-C(B)

State B is willing to accept the contract if the payout from accepting is larger than the payout from rejecting. The converse is true. Let's see what State B does by setting up an inequality.

1-x>= 1-P(A)-C(B)
-x>=-P(A)-C(B)
x<=P(A)+C(B)

Thus, as long as the demand from State A is less than the cost of war than State B will accept. 

Let's look at it from State A's Perspective, there are two options. Remember that State A's payoff is increasing in x so the larger the x the better. So instead of offering an x<=P(A) +C(B), State A will offer an x=P(A)+C(B), which is the maximum amount of x that State A can get without State B rejecting. Anything larger, State B will reject. 

So,

What is better for State A?
1. x=P(A) + C(B) ----> State B accepts offer----> State A earns x
2. x> P(A) + C(B)----> State B rejects offer----> State A earns war payoff= P(A)-C(A)

P(A)+C(B)>P(A)-C(A)... So option 1 is better! Look at the 0 to 1 scale.

State A is able to gain the loss that State B would incur during a war through the settlement. 

Relaxing these assumptions gives us a more rationalist explanation for most wars because, afterall, this model only shows peaceful solutions and does not explain other phenomenon that have happened throughout history. However, this model can be nicely applied to the Cold War.

Question: Why was the Cold War never a hot war?

The most simplistic answer that I would give is: Nuclear Weapons. 

"How I stopped worrying and learned to love the bomb"- Dr. Strangelove
film black and white stanley kubrick peter sellers mygf
source:http://giphy.com/gifs/stanley-kubrick-peter-sellers-dr-strangelove-or-how-i-learned-to-stop-worrying-and-love-6zE5U2oxKzCw

But before getting into that I would like to give a brief history lesson. At the end of World War II Europe was split along a line known as the Iron Curtain, separating the "Western World" and the USSR. 

source: http://kirycoldwar.weebly.com/uploads/2/9/9/5/29953109/877879467.jpg 

Two prominent powers emerged... The United States and The Soviet Union. At first the United States was the only country to have the power of nuclear weapons, but an arms race began and the Soviet Union soon gained nuclear weapons after. 

The power of nuclear weapons is truly unfathomable and the stockpiles of each super-power had the capacity to destroy the world 100-fold. 

The presence of two super-powers brought to life a theory known as Mutually Assured Destruction (MAD).

Mutually Assured Destruction occurs if:
1. Both states are self-preserving (States aren't actively trying to be vanquished)
2. Both states have stockpiles of nuclear weapons
3. Each state has a secured second strike; no state can achieve a splendid first strike 

Second strike: having the capability to launch a nuclear retaliatory strike after being struck.
Splendid first strike: being able to destroy most of the retaliatory response and achieve minimal damage to self.

Under these assumptions, no side would want to start a large-scale war because no side would win.

If the United States started a war, the United States would face enormous nuclear retaliation from the Soviet Union. (Second Strike)

Likewise, if the Soviet Union started a war, the Soviet Union would face enormous nuclear retaliation from the United States. (Second Strike)

With that information it should be understood that the cost of war increases dramatically. An increased cost of war dramatically increases the bargaining range of a mutual agreement, thus it is much more likely that a mutual agreement occurs.

Bargaining range is x in:
P(A)-C(A)<x<P(B)+C(B)

Another way to view this information is through a Nash Equilibrium.

It can be shown through payoff in a Nash Equilibrium:
(USA,USSR)
Peace
Nukes
Peace
(1,1)
(0,4)
Nukes
(4,0)
(0,0)

Above is a Nash Equilibrium table and it shows the payoffs for the following scenarios. I believe Greg will be doing Nash Equilibriums in Submarine vs. Destroyer, as well as myself solely on the topic in another blog so I will not be getting into detail on the blog (but I will in class!). This one specifically implies that there is no winner to a nuclear war between countries who both are able to nuke.

Nuclear war means death for just about everyone as we know it.

Due to this stalemate of nuclear weapons, the United States needed to resort to other uses of power to deter the Soviet Union from encroaching into Western Europe.

A policy of the United States was extended deterrence, which is the use of weaponry or presence to deter attacks on allies. The United States was allied with any participant in NATO and, for that reason, had interest in Western Europe.

The United States never official used Mutually Assured Destruction as a policy, but it did use the threats of conventional and targeted nuclear strikes to deter the Soviet Union from invading Western Europe as we know it.

As Dr. Jockel said, "The best way to play chicken is to put on a blindfold and hold whiskey bottles."

Chicken is a game with two participants who drive cars at each other and the first one to swerve out of the way loses.

This quote from Arms and Influence is similar, "Manipulating the shared risk of war. It means exploiting the danger that somebody may inadvertently go over the brink dragging the other with him. If two climbers are tied together, and one wants to intimidate the other by seeming about to fall over the edge, there has to be some uncertainty or anticipated irrationality over it" source 2

Basically you pretend to be crazy and your opponent has no choice but to believe your bluff.

The United States was able to deter the Soviet Union from entering Western Europe through the bluff of chicken.

Now its time for some food for thought...

Would the proliferation of nuclear weapons stabilize the world and bring about peace/mutual agreements instead of war?

-How should the United States react to a Russian invasion of the Baltic states?

-How does Mutually Assured Destruction jeopardize extended deterrence?


Bibliography:

1.Spaniel, William. Game theory 101: the rationality of war.
Chapter 2: War’s Inefficiency Puzzle

2. University, Harvard, and Thomas C. Schelling. Arms and influence. Greenwood Press, 1976.

page 99

3.JimBobJenkins. "International Relations 101 (#19): Crisis Bargaining." YouTube. YouTube, 20 Aug. 2012. Web. 13 Mar. 2017.